The Zone System
Photography is a science as well as an art. We must not only be creative in our craft, but we must have an understanding of optics, the physical properties of light and a good basic understanding of chemistry. This is why you must study the science of photography as well as the art. Everything you learn on the science side will aid your artistic side, as well as keep you safe when mixing and experimenting with different chemicals. The zone system is a scientific approach to the artistic side that will improve anything you ever undertake in photography. It seems that a lot of those professing to be photographic artists do not want to spend the time and effort to thoroughly learn the zone system. This is a shame too, because they are cheating themselves of their full artistic potential. I have spent many years trying to perfect my craft and the zone system is an integral part of everything I do in photography. It is, in my opinion, imperative that all who venture into photography learn the zone system. "The Negative" by Ansel Adams is by far the best on the zone system and should be read by all. I will attempt to give you a good overview of the subject here, and remember, film is the cheapest thing you will ever buy in photography, so use a lot of it in your venture into the zone system...
_________________________________________________________
Before undertaking the zone system, you MUST have a good knowledge of manual cameras and good basic darkroom experience with development of film and printing of photographic papers. The entire premises of zone system hinges on the proper manual manipulation of the exposure of the film AND the proper manipulation of the development of the latent image on the film. If properly implemented, the negatives should print correctly on a grade #2 or #3 paper (depending on the type enlarger you are using).
With the zone system, our concern is the negative and not the print. If our negative is exposed properly, it will render a good print. If it is not exposed properly, obtaining a good print is futile. We must do everything to ensure the negative is exposed and processed properly AND the utmost care is taken in properly loading our film for processing and handling the finished negatives. When considering loading film, we must choose the best options that will render the best consistent results. We have two major types of developing tanks, plastic and stainless steel. While both will work fine, I suggest using the Nikor or Omega type of stainless steel. Although, at first, stainless steel reels seem to be harder to load, with a little practice, you should be able to master it in no time. Plastic reels are loaded from the outside in, so the film is pushed onto the reel with a "ratcheting" effect. Although this is easier for the beginner, the slightest obstruction or crimp on the corner of the film can make it "buckle" thus causing a dark half-moon shape on the developed negative, thus making it unusable. The major problem incurred with stainless steel reels is when the film is not loaded properly and touches itself thus causing those portions to be undeveloped. This is why beginning students need to take a long strip of old film and practice in the dark until they have the technique down. Once you get used to stainless steel, you will not want to use anything else.
Whether you are using stainless steel or plastic, in the case of a two or more reel tank, always put the reel with the loaded film on the bottom and empty reels on top. This will take up the empty space in the tank, thus cutting down on the movement of the reel in the tank during agitation. When there is excess movement of the reel in the tank, the film could possible come partially off the reel, thus scratching the delicate emulsion. Also, if by chance the chemistry is not quite full enough, you will still get adequate development.
ALL loading of film MUST be done in total darkness (NO SAFELIGHT). Once you have the film on the reels and in the tank, properly capped, development can be done in normal room light. It is always a good practice to check the tank lids for cracks or splits around the lip. This could cause the tank not to be light tight resulting in fogging and/or partial exposure of your film. Once you have the film in the tank, follow instructions on proper developing, fixing, and wash times for the chemistry chosen. (check chemicals and formulas page).
When we look at a subject or a scene, what we see in our mind may be totally different from what we are seeing with our eyes. If we simply take a color photograph of the subject, it may have nice colors and be pleasing to the eye, but it is simply a rendition or recording of the scene before us. We must disregard the colors in the scene and visualize it as shadows and highlights. Hence, we must train ourselves to "see" in black and white. If we take a standard color photograph of the scene, provided we have a colorful setting and a proper exposure, we will have a pretty picture. This can be achieved with any standard automatic camera on the market today. If you shot the same scene with the same exposure in black and white, the outcome may be very different. This is where the zone system is a valuable tool when shooting black and white. With the zone system we can manipulate the exposure and development to achieve the desired contrast and tonal quality of the photograph, thus giving us control over how the negative will look. At the time of exposing the film, you should only be concerned on how the negative will appear, not the final print. If you have exposed and developed the film properly, you will have a good negative and the final printing should be done with minimal adjustment. Even with the array of multigrade photographic papers and different developers available, you cannot get a good print from an improperly exposed negative. A properly exposed negative should print correctly on a #2 grade paper using a condenser enlarger and on a #3 grade paper using a cold light or diffusion enlarger. At this time, you may ask yourself why go to all the trouble of using the zone system to achieve this contrast on the negative when you can vary contrast grades of paper to compensate for the difference. By using paper grades to adjust contrast, especially in the higher grades, it is difficult to retain subtle contrasts in higher and lower tonalities. In fact, you may lose all subtle tonalities by going several grades higher. Put simply, the higher you go on contrast grades over the normal, the more subtle tones the paper drops to achieve a greater contrast.. Certain tones will have to be deleted in order to obtain the contrast. If no tones were dropped, then we would have no change.
The Gray Scale
Technically, the basic gray scale is divided into eleven values (or zones), ranging from 0 to X with 0 being full or total black and X being pure white. Before anyone starts questioning me, I realize that most photographers recognize 10 zones because this is, for the most part, the maximum that papers today can render. The following chart shows the zones and their representative shades in the gray scale.

Zone I - Total black in print. No useful density in the negative other than film base and fog.

Zone II - First suggestion of texture. Deep tonalities, representing the darkest part of the image in which some slight detail is required.

Zone III - Average dark materials and low values showing adequate texture. First zone with shadow detail.

Zone IV - Average dark foliage, dark stone, or landscape shadow. Normal shadow value for Caucasian skin in sunlight.

Zone V - Middle gray (18% reflectance). Clear north sky as rendered by panchromatic film, gray stone, average weathered wood. Average tonal value for dark skin.

Zone VI - Light stone, shadows on snow in sunlit landscapes, clear north sky on panchromatic film with a light blue filter. Average Caucasian skin value in sunlight, diffuse skylight, or artificial light.

Zone VII - Very light skin, light gray objects, average snow with acute side lighting. Last zone with distinguishable textured highlights.

Zone VIII - Whites with texture and delicate values. Textured snow.

Zone IX - White without texture. Approaching pure white. Compatible with Zone I in it's slight tonality without true texture. Snow in flat sunlight. With small format negatives printed with a condenser enlarger, Zone IX may print as pure white and not distinguishable from Zone X.

Zone X - Pure white paper base. Spectacular glare or light source in the picture area.
Zone V is middle gray and is represented by 18% reflectance. A gray card is a true zone V and is used when taking exposure readings of your subject. These are available in most good camera stores and are relatively cheap. All reflective light meters read everything as a zone V because that is the middle of the gray scale and averages all light reflected from the subject to give you an exposure average for the entire subject. This is fine for most "snapshot" types of photographs because we are wanting an average exposure reading to get a good average exposure of the subject brightness (the amount of light reflected by the subject). Brightness is also referred to as luminance and is measured in c/ft2 (candle foot squared). The Reciprocity Law applies to all normal exposure values except for very long or very short exposure times. During very long and very short exposure times we experience reciprocity failure. I will delve into this more later. The Reciprocity Law is the basic formula: Exposure = Intensity X Time whereas the exposure is equal to the intensity of the light multiplied by the duration of time the light strikes the film. For instance, if we see a value that we would like to place in zone IV, we take a reflective meter reading off of our gray card. Let us suppose the reading we get is 1/60 sec. on f/5.6. If we made the photograph at this exposure, the value we wanted as a zone IV would fall as a zone V. We must manipulate the exposure manually to cut the time OR intensity of light by one zone. This means we would either choose 1/125 sec. at f/5.6 OR 1/60 sec. at f/8. We can place these zones in higher or lower values with the manipulation of the exposure. For each stop addition of light, we increase one zone. For each stop reduction of light, we decrease one zone. The following chart shows the correlation of zones if our zone V reading were 1/30 sec. at f/8:
Zone IV 1/30 at f/11 Zone VI 1/30 at f/5.6
Zone III 1/30 at f/16 Zone VII 1/30 at f/4
Zone II 1/30 at f/22 Zone VIII 1/15 at f/4
Zone I 1/60 at f/22 Zone IX 1/8 at f/4
Zone 0 1/125 at f/22 Zone X 1/4 at f/4
*** The actual sequence may be altered to fit shutter speed and aperture availability.
In value placement, we can control the outcome of the negative. Simply put, we want to expose for the shadow areas (the lower zones) and develop for the highlight areas (the higher zones). We want to place the values with full shadow detail in zone III, and we want full highlight detail to fall in zone VII. It is important to previsualize the scene to determine what you want it to look like with regard to tonal range and where you want the zone III and zone VII to be.
We first determine where the zone III will be with respect to where we want the darkest shadows to be that still retain full detail. Take a meter reading off of this area. If we use the afore mentioned chart as an example reference, we will say, hypothetically, that our reading is 1/30 at f/8. If you were to expose at this reading, the shadows would appear at a zone V since meters read everything as a zone V. Since we want full shadow detail in zone III, we must compensate by reducing exposure by 2 zones (or stops) and expose at 1/30 at f/16. This would be the proper exposure for this particular subject. Since highlights are controlled by development, we must now take a meter reading off of our highlight areas to determine development. Since we want the shadows to fall in zone III and the highlights to fall in zone VII there must be four stops difference between the zone III shadows and the zone VII highlights. If we indeed do have four stops difference, then we will have normal (N) development. If we have three stops difference, then we have to make up that difference by adding time to the development to compensate for the difference. This would be normal plus one stop development or N+1. Likewise, if we have only two stops difference, we will need to go to N+2 development. This is called expansion development. Usually this will be indicative of flatly lit subjects as with a very overcast day.
Conversely, if we have too many stops difference, we must reduce the development time of the highlights to compensate. This is called contraction development, and is represented by N-(?). If we have five stops difference, then we must go N-1. This is usually representative of harshly lit subject matter with deep shadows and glaring highlights.
Shadows will fully develop within the first three minutes so expanding or contracting development controls the highlights. If we increase the development time, we increase the contrast. If we decrease the development time, we then decrease contrast. There are limits, however, as to the amount of expansion or contraction that film can handle. A good rule is to never try to expand of contract more than N(+ or -) 2, although N (+ or -) 3 can be achieved with the proper film and developer. Expansion of film can tend to lead to more graininess. Different film speeds also limit the amount of expansion or contraction that is obtainable.
Film speeds are rated in ASA/ISO numbers. The lower the number, the slower the speed, and thus, the more light it takes to expose it. ISO is the term used today for film speed, but some that have been into photography for a while will recall ASA. These are the same. Manufacturers ISO numbers differ from the true ratings of the films. The following chart shows the true rating of these films as compared with the manufacturer numbers. The true ratings are the ratings film should be shot at.
MANUFACTURER TRUE
Kodak Tri-X 400 250
Kodak Plus-X 125 64
Kodak Panatomic-X 50 20
Ilford HP-5 400 250
Ilford FP-4 125 100
Ilford Pan-F 50 25
Agfa AgfaPan 25 25 25
Agfa AgfaPan 100 100 100
I have personally not extensively tested any of the Kodak T-Max films as I rarely use them unless I need a very fast film to push in very low light situations. My personal choices for different speed films are; slow film - AgfaPan 25; medium speed film - Ilford FP-4; and fast film - Ilford HP-5. These are, of course, my personal choices. After shooting many different types of subject matter and experimentation under an array of lighting conditions, using thousands of rolls and sheets, these consistently yield the best results with respect to grain structure and tonal quality, especially in the threshold zones.
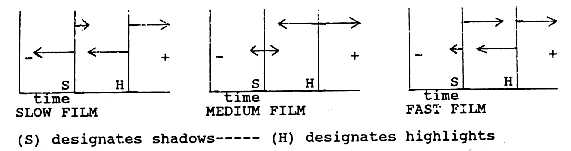
When choosing a film for a certain lighting situation, you need to consider whether you will have normal, expansion, or contraction development. First, do some test readings to see what the current conditions call for, then choose the correct film for the circumstances. If you find that you will have normal, N+1, or N-1 development, then you will need a medium speed film such as Ilford FP-4. If you see that N+2 is required, then a slow film is in order such as Agfa AgfaPan 25. If you see that N-2 development is required, then use a fast film such as Ilford HP-5. The reason for this is because of the physical properties of the film as to how it reacts to longer or shorter development times. In the case of medium speed films, the shadows remain constant while the highlights can expand or contract up to one full stop. Slower films tend to be able to retain constant shadows while highlights can be expanded for up to two full stops, and in some instances, three stops. If you contract slower films the shadows will follow the highlights and result in an overall thinner negative. In the case of faster films, the shadows will follow the highlights in expansion resulting in an overall denser negative.
The following shows the effect of expansion and contraction development on film:
To calculate the expansion and contraction times for developers, use the following methods:
For expansion development, take the normal development time and multiply it by 27%. Than add this total to your base development time. Hence, if you have a development time of 10 minutes, multiply 10 by 27%. This gives us 2.7 added to 10, or 12.7. For simplicity, This will be 12 minutes 45 seconds (rounded). This will be the base for calculating N+2 development, whereas, 12.75 will be multiplied by 27%, and so on.
For contraction development, we figure the same way, only we multiply by 18% and subtract that from our base number. Using 10 minutes, we multiply 10 by 18% which gives us 1.8 subtracted from 10 or 8.2. This would simply calculate to 8 minutes 15 seconds (rounded).
The following are some precalculated times:
N-3 N-2 N-1 N N+1 N+2 N+3
5.50 6.50 8.25 10 12.75 16 20.50
4.50 5.50 6.50 8 10 13 16
Earlier I mentioned the Reciprocity Law and reciprocity failure. Reciprocity failure occurs because film cannot absorb light at a constant rate especially with longer exposures. The longer the exposure, the more sever the reciprocity failure. To calculate reciprocity failure of a certain film, it takes quite a bit of time and many exposures, and then densitometrically analyzing the exposures. All exposures must be done in a very controlled environment with regard to film emulsion lots, lighting, meticulous processing in the same developer at the exact dilutions, temperature, and time.
As you expose film at a long exposure, the actual exposure will be greater than the metered exposure. Meters do not calculate for reciprocity failure. In the chart below, reciprocity failure has been calculated for different films. The "indicated" is the light meter reading and the different columns are the actual exposure times for different films. As you can see, due to reciprocity failure, if you went only by the light meter reading, lengthy time exposures would be grossly under exposed.
INDICATED PAN-F, FP-4, AGFA25 & 100 HP-5 ALL KODAK
1 sec. 1.2 1.3 2
2 sec. 2.6 3.1 5
4 sec. 6.2 7 15
8 sec. 14.5 16 38
16 sec. 35 42 80
32 sec. 82 93 200
40 sec. -- -- 300
50 sec. -- -- 425
64 sec. 205 234 560
70 sec. -- -- 710
80 sec. -- -- 865
90 sec. -- -- 1040
100 sec. -- -- 1200
128 sec. 498 568 --
*All times above are in seconds.
The zone system is like anything else in the art, you must practice and use it. The more you work with it, the more accustomed you will become with it and you will see a dramatic improvement in your photographs. With the zone system, you are working with black and white, the purest form of photography, so use the best way known to give you the perfection that you should strive for.